Competition Rules
The full official ADESC Game Rules — scroll within the box below to read the complete document, including field layout, scoring, and safety requirements.
ADESC Student Competition
Aerial Laser Tag
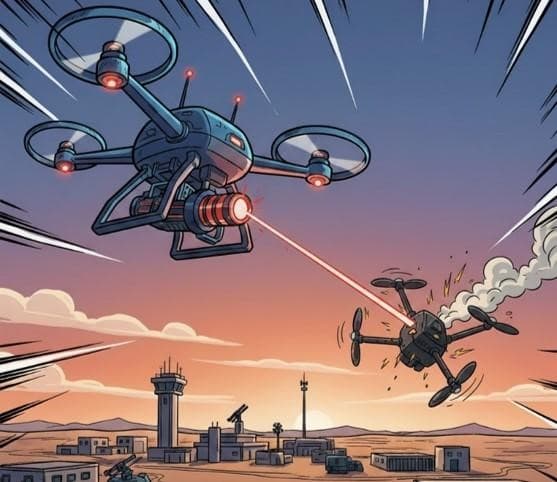
The Blue Drone engages a Red threat with its optical dazzler.
1. Mission Overview
Somewhere beyond the wire, hostile drones are inbound — and their objective is your High Value Target (HVT). Your job: stop them, without ever firing a kinetic shot.
Welcome to Aerial Laser Tag, ADESC's first student competition in directed energy (DE) systems integration. Each Blue Team (that's you) designs, builds, and flies a single aircraft — the Blue Drone— armed with a non-damaging, eye-safe laser dazzler, backed by a ground-based sensing network of the team's own design. The mission is simple to say and hard to do: find, fix, track, and blind every attacking Red Drone before it reaches the HVT. Three scenarios, three different fights:
- Scenario 1 — Long-Range ISR: patience and precision — hold a dazzle at distance.
- Scenario 2 — Direct Attack: a dumb knife fight — rapid-fire threats test how fast your kill chain really works.
- Scenario 3 — Evasive Attack: smarter threats that want you to miss test your control and feedback system.
But this isn't just a shooting contest. Your design report, your regulatory compliance, and your safety discipline all count toward the final score — because in directed energy engineering, rigor is the mission, not a footnote.
2. Field Layout
The field is built from concentric zones around the HVT, each with its own rules on where you can fly, engage, and target. All zones extend vertically to 400 ft above ground level (AGL).
- Blue Zone (Blue): 100m × 100m, centered on the HVT. Your staging ground — ground-based sensing equipment goes here (no other aerial assets, per Section 7). Engagements are allowed here. Your Blue Drone starts every scenario in this zone.
- Engagement Zone (Gray): extends 300m beyond the Blue Zone. The main event — Red Drones enter here to begin their run, and this is where most engagements happen. The Blue Drone may enter in Scenarios 2 and 3, once the first threat is detected.
- Red Zone (Red):extends 100m beyond the Engagement Zone. Red Team's launch and staging ground. You can track and target here — you just can't fly or engage here. Off-limits to the Blue Drone, full stop.
- Buffer Zone (Yellow):extends 50m beyond the Red Zone. Cross into it and you're disqualified from the scenario.
- Observation Zone (White): where people are — Blue Team members, referees, safety officers, spectators. Your laser can never be armed while aimed toward it, at any elevation.
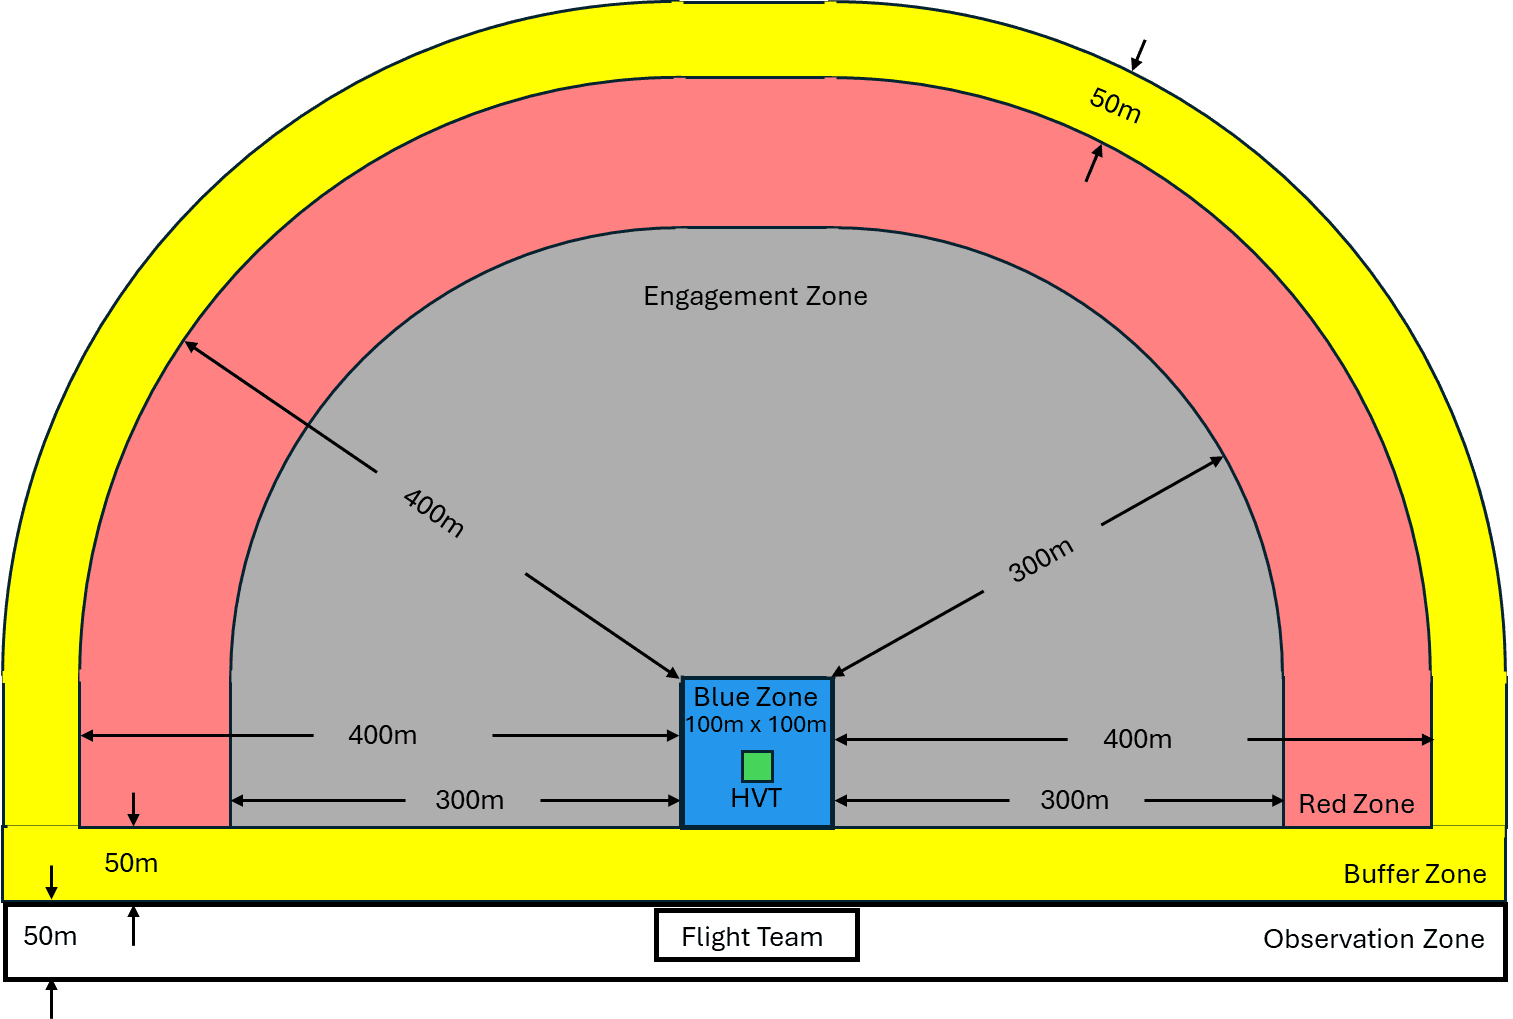
Figure 1: Field layout and operational zones
3. Red Team Systems
The Red Team is managed by the Competition Staff. All Red Team threats are DJI Mini Pro 5 UAVs — the Red Team fields 8–10 of them to keep the action moving. They always launch from the Red Zone and fly preset paths toward the HVT, through the Engagement and Blue Zones, at 2.5–10 m/s. Every team faces the same flight paths, so it's a level playing field.
Camera specs for the sensor you're dazzling:
- 50 MP or 12 MP, 1" CMOS (12.8mm x 9.6mm)
- 1.56 µm pixels (8192 x 6144) or 3.125 µm pixels (4096 x 3072)
- 84° field of view (FOV), f/1.8
- Focal length: 8.73 mm
- Aperture diameter: 4.85 mm
4. Dazzling
Dazzling is simple: if the Red Drone Operator can't see their target through the camera, that's a dazzle. They'll call "Dazzle On" / "Dazzle Off" to a judge stationed with them in the Red Zone, who times it. You won't find out if your engagements landed until the scenario's over — no live feedback, no second-guessing the judge mid-run.
5. Scenarios
5a. Scenario Overview
Every scenario runs 15 minutes unless a mission failure ends it early. The Red Drone's camera stays gimbal-locked on the HVT throughout — a fixed target for you to hit, on a platform that's anything but fixed.
Ground rules for all three scenarios:
- Stay in your zone. Engagement Zone violations (Scenario 1) or Red Zone violations (Scenarios 2/3) draw a point penalty (Section 6b). Buffer or Observation Zone violations — or leaving the field through the Red Zone — fail the scenario outright: you get zero points, or keep your already-earned negative points, whichever is lower. No exceptions.
- Never arm the laser toward the Observation Zone. Doing so fails the scenario: you get zero points, or keep your already-earned negative points, whichever is lower. No exceptions.
- One drone. Only the Blue Drone may engage — your home-built ground systems can image, track, and communicate, but they cannot engage.
- The Blue Drone is your only aircraft (Section 7) — no other aircraft, period.
- Collisions are on you to avoid, since Red Drones fly fixed paths. Kinetic kills are strictly prohibited — any collision fails the scenario: you get zero points, or keep your already-earned negative points, whichever is lower. No exceptions.
5b. Scenario 1: Long-Range ISR
A Red Drone loiters at the edge of the Gray Zone, gathering intel on the HVT. It holds position for a while, then starts slowly orbiting to test your tracking. Your Blue Drone cannot leave the Blue Zone.
The Challenge: Precision at distance.
Mission Success:Points scale with total dazzle time across the full 15 minutes — accumulated, never reset. High-quality optics and rock-steady long-range tracking win here. The Red Drone cannot be neutralized in this scenario; it's about sustained dazzling, not a kill.
5c. Scenario 2: Direct Attack
A single Red Drone comes in fast and straight, direct from staging to the HVT — and it keeps coming, wave after wave, until 15 minutes run out or you hit 10 kills. You won't know the attack vector beforehand. Once you spot the first threat, you're cleared into the Engagement Zone and don't need to return to the Blue Zone between waves.
The Challenge: Rapid acquisition, sustained dwell time.
Mission Success: Score by kill count. A kill = 5 seconds of continuous dazzle; accumulated dazzle resets if dazzling is noticeably lost, as judged by the Red Drone pilot. The faster you score, the more waves you get to face.
Mission Failure:Every successful Red Drone strike on the HVT costs you points. Three strikes and the HVT is down — mission failed, scenario ends, and you're scored on kills banked so far.
5d. Scenario 3: Evasive Attack
Same fight as Scenario 2, but the Red Drone won't fly straight — zig-zags, altitude shifts, no predictable line of approach. This time you'll know the attack bearing beforehand, but turning that intel into a lock is on you.
The Challenge: Dynamic tracking, gimbal agility. Erratic threats reward fast, adaptive autonomy and low-latency control.
Mission Success / Failure: Same rules as Scenario 2.
Note: the attack bearing (0°–360°, 0° = North, provided as a 20° cone) is provided to the Blue Team and must be manually relayed into your target acquisition system. This one manual step does not affect your autonomy classification (Section 6a).
6. Blue Team Roles
Blue Team:the student team designing and flying the Blue Drone — your team's only aircraft — plus any ground-based sensing network you build for command & control (C2) and for finding, fixing, tracking, and targeting Red Drones.
At registration, every team must appoint:
- Team Captain — owns registration and submission of competition deliverables.
- Team Laser Safety Officer (Team LSO) —owns your team's laser safety program for the whole competition year (full duties in Section 9b). This is an administrative role — the Team LSO does not need to attend the competition in person.
On competition day, every team must field at least three people:
- Team Captain — your liaison with competition personnel (same person as above).
- Team Flight Safety Officer (Team FSO) — controls laser arm/disarm and flight safety abort. May or may not be the same person as your Team LSO.
- Remote Pilot in Command (RPIC) — flies the aircraft. Certification requirements are covered in Section 9a.
You'll get 10 minutes to set up and 10 minutes to tear down around each scenario, plus pre-scenario airworthiness checks. Bringing extra hands as pit crew isn't required — but it helps.
7. Competition Team Staff Roles
- Red Team — competition personnel who launch, recover, and fly the threat drones. A designated pilot can take manual control if needed.
- Competition Safety Officers — a Competition FSO and Competition LSO oversee all competition operations: they clear teams to compete, call safety aborts, and issue disqualifications.
- Judges & Referees — score your performance each scenario — autonomy level, successful engagements, and rule infractions.
8. System Constraints, Regulations, and Safety
8a. Unmanned Aerial System
Your unmanned aerial system (UAS) operates under the recreational/Community-Based Organization (CBO) framework of 49 U.S.C. § 44809 and the Academy of Model Aeronautics (AMA) National Model Aircraft Safety Code:
- Weight: under 55 lbs (§ 44809(a)(3), AMA Safety Code).
- Speed: ground speed capped at 100 mph.
- Altitude: capped at 400 ft Above Ground Level (AGL) (§ 44809(a)(6)) — this cap must be built into your geofencing.
- Pilot: your RPIC must be able to take control at all times, even during autonomous flight. Must be a current AMA member operating under the AMA Safety Code, and hold proof of completion of TRUST (The Recreational UAS Safety Test), as required under § 44809(a)(2) — a Federal Aviation Administration (FAA) Part 107 Remote Pilot Certificate satisfies this requirement too.
Required safety features:
- Return-to-home (RTH): the drone must demonstrate it will return to its takeoff point on lost link, or when autopilot assistance is needed to bring it home.
- Geofencing: a 3D flight barrier the drone cannot leave, even when piloted, unless manually disabled — capped at 400 ft AGL. Must be visually demonstrated in software during operation.
8b. Laser System
- Wavelength/class: Green 532nm, Class I or Class II only.
- Arm/disarm switch: operated by the Team FSO. The laser cannot fire — autonomously or manually — unless armed.
- Aim restriction:the laser can never be armed while aimed toward the Observation Zone (Section 2), judged by top-down direction only — elevation doesn't matter. Infractions mean penalties or disqualification. Must be visually demonstrated in software during operation.
Team Laser Safety Officer (Team LSO): appointed at registration, held for the whole competition year. Distinct from the Team FSO role (Section 7), though one person can hold both. If your Team LSO steps down mid-year, you must certify a replacement within 30 days.
Your Team LSO must:
- Hold a current Occupational Safety and Health Administration (OSHA) / American National Standards Institute (ANSI)-compliant laser safety certification (e.g., an accredited industrial laser safety technician course).
- Train every Blue Team member on laser safety before they touch the system — training must be complete before a laser is delivered to the team and the LSO is responsible for recording each team member, the date their training is delivered, and their signature. This log is a required deliverable with the design report (Section 6c).
- Base that training on ANSI Z136.1 and Z136.5, scaled to your Class I/II system.
- Keep a signed training log, submitted with your design report (Section 6c).
No certified Team LSO on file at registration means your team cannot participate in the competition. Any team member who hasn't completed Team LSO-delivered training may not participate.
8c. Qualifications and Scenario Safety
Before you fly a scenario, you'll demonstrate compliance under the Competition FSO and Competition LSO's supervision:
- Weigh-in
- Geofencing demo (manual and autonomous, if applicable)
- Return-to-home demo
- Laser classification demo — fire into a power meter and confirm ≤ 1 mW. Don't trust the datasheet; test it yourself.
- Demo that the laser cannot be armed while aimed at the Observation Zone
During scenarios, your software compliance visual aids must stay visible to the Competition FSOs, and every Blue Team member near the engagement zone needs their own laser eye protection (LEP) — bring your own.
9. Scoring
9a. Autonomy Classification
The more autonomous your kill chain, the higher your Autonomy Multiplier (Ma):
- Full autonomy (Ma = 3):ground-based sensors and the Blue Drone's onboard sensors feed the Blue Drone, which acts on that information and engages without pilot input. Operator input is limited to arm/disarm, safety abort, and scenario initialization.
- Partial autonomy (Ma = 2): the Blue Drone flies and aims autonomously, but other parts of the kill chain need operator input.
- Limited/no autonomy (Ma = 1): most of the system needs a pilot or operator — any manual flight or aiming input puts you here.
9b. Scenario Scoring
Scenario 1:
Range: −uncapped penalties ≤ Score1 ≤ 3000
Scenarios 2 & 3 (max 10 kills; 50-point penalty per successful HVT hit):
Score2 = 100 × Ma × kills − 50 × HVT hits − Penalties
Range: −150 − uncapped penalties ≤ Score2 ≤ 3000
Penalties:
- Late setup:10 minutes to set up. A judge calls time, you get a 30-second grace period for final touches, then it's 100 points per minute over.
- Boundary violations: a single 10-second grace period to get back in bounds, then 100 points per 10 seconds spent out of bounds.
- Buffer/Observation Zone violation: scenario failed — you get zero points, or keep your already-earned negative points, whichever is lower.
9c. Design Report
Submit your design report to the Competition Team by January 15, 2027. Worth up to 1000 points (ScoreDR). Late by a day, lose 100 points; late by more than 30 days, you're out of the competition.
Minimum requirements: bill of materials with itemized costs, wiring diagram, laser datasheet, UAS datasheet, and preflight checklist. Beyond that, how you organize it and what you cover is up to you.
Hint: a clear, visual report — CAD, flow diagrams, photos, annotated control schemes — beats a wall of dense, third-person text, even between two equally strong designs.
9d. Final Score
Every scenario blends performance, autonomy, and penalties into one number — built to reward teams who design for real-world DE engineering, not just competition day.
Source: ADESC Game Rules V9. This is a full transcription of the official rules document — refer to the official document for the authoritative version if any discrepancy is found.